
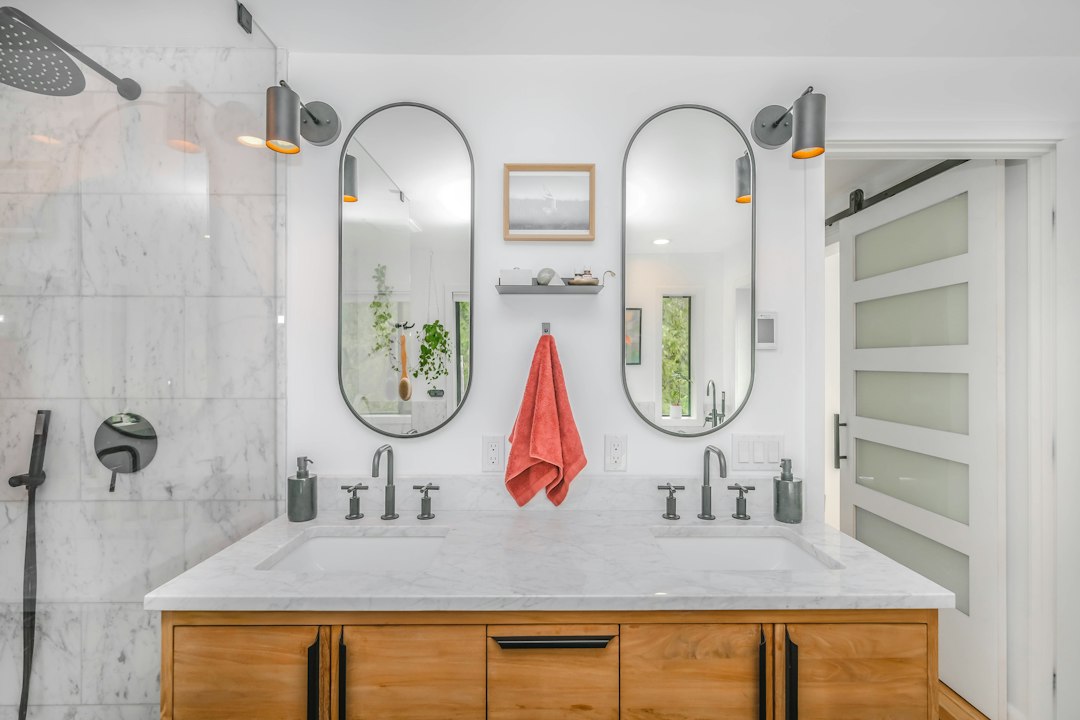
Vanity Mirror Light Installation Tips for Perfect Bathroom Lighting
Finding the right light for your vanity mirror can really make a difference in your bathroom routine, and getting it installed correctly is key to achieving that perfect, even illumination. While it might seem daunting, with a bit of planning and the right approach, you can significantly upgrade your bathroom’s lighting and functionality. The goal here is to eliminate harsh shadows and provide a consistent glow that’s ideal for tasks like applying makeup or shaving.
Understanding Your Current Setup and Needs
Before you even think about buying new lights, take a good look at what you already have and consider what you actually need. This step is crucial for avoiding common pitfalls and ensuring your new lighting truly meets your expectations.
Assessing Existing Electrical Wiring
The first thing to check is your current electrical situation. Do you have an existing light fixture above or beside your mirror? If so, great! This usually means there’s a junction box already in place, simplifying the installation process significantly.
- Existing Junction Box: If there’s a visible light fixture, chances are there’s a junction box behind it. This is where your new light fixture will connect. Make sure the existing box is securely mounted and in good condition. Sometimes, older boxes might be loose or damaged, requiring a quick repair or replacement before installing new lights.
- No Existing Wiring: If you’re starting from scratch – say, you have a plain mirror with no dedicated light – then things get a bit more involved. You’ll need to run new electrical wiring to a suitable location for your lights, which typically involves opening up walls. This is where calling a qualified electrician is highly recommended, as working with new wiring can be complex and potentially dangerous if not done correctly. Don’t underestimate the importance of proper electrical work for safety and functionality.
- Switch Location: Where is the light switch located? Is it convenient? Sometimes, people want to add a dimmer switch, which is a fantastic upgrade for bathroom lighting, offering flexibility in brightness. If you’re planning on a dimmer, ensure your new light fixtures are dimmer-compatible and that your existing switch box can accommodate the new switch.
Considering Light Type and Placement
The type of light and where it’s placed are just as important as the fixture itself. Different light types serve different purposes, and optimal placement is what truly eliminates those unwanted shadows.
- Sconces vs. Bar Lights:
- Sconces: Typically mounted on either side of the mirror, sconces provide excellent cross-illumination, minimizing shadows on your face. The ideal height for sconces is usually at eye level, around 60-65 inches from the floor, to avoid harsh upward or downward shadows. Consider sconces that diffuse light evenly rather than directing it in a narrow beam.
- Bar Lights: Often mounted above the mirror, bar lights can work well if they are long enough to span the width of the mirror and emit sufficient light downwards. However, if they’re too short or too focused, they can create shadows under your chin and eyes. For optimal results with a bar light, look for one with multiple light sources or a long, diffused panel.
- Kelvin Temperature (Color Temperature): This is where you get to decide the “warmth” or “coolness” of your light.
- Warm White (2700K-3000K): Creates a cozy, inviting atmosphere. Good for relaxing, but might not be ideal for tasks requiring precise color judgment, like makeup application, as it can make skin tones appear warmer than they are.
- Cool White/Daylight (3500K-5000K): Mimics natural daylight and provides excellent clarity for tasks. This is generally preferred for vanity lighting as it offers true color rendering, helping you see colors accurately. Anything above 5000K can start to look very blue and harsh, which might not be comfortable for prolonged use.
- Brightness (Lumens): Don’t just look at wattage; focus on lumens, which measure the actual brightness of the light. For a vanity area, you want sufficient brightness without it being blinding. A good starting point for a typical bathroom is around 800-1000 lumens per foot of vanity, but this can vary based on personal preference and the overall size of your bathroom. If you have other light sources in the bathroom (like recessed ceiling lights), you might need less concentrated brightness from the vanity lights.
Mirror Size and Shape Considerations
Your mirror isn’t just a reflective surface; it’s a key element in how your vanity lighting performs. The size and shape dictate the scale and placement of your light fixtures.
- Mirror Width: Your light fixtures should ideally be proportional to the width of your mirror. If you’re using a single bar light above the mirror, it should be at least two-thirds the width of the mirror, but ideally closer to the full width for optimal coverage. For sconces, their combined width (including the space between them) should be less than the mirror’s width to avoid looking cramped.
- Mirror Height: If your mirror is unusually tall or short, adjust the height of your sconces accordingly. The goal is always to get the light source as close to eye level as possible.
- Framed vs. Frameless: A framed mirror might influence how much space you have for side-mounted sconces. Frameless mirrors often offer more flexibility in light placement.
- Multiple Mirrors: If you have a double vanity with two mirrors, you’ll need to plan for lighting for each mirror, ensuring consistent illumination across the entire vanity area. This usually means either two bar lights or four sconces (one on each side of each mirror).
Choosing the Right Fixtures and Bulbs
Once you have a clear idea of your needs and existing setup, it’s time to select the actual light fixtures and bulbs. This is where aesthetics meet functionality, and making informed choices will pay off in the long run.
Material and Finish Consistency
While practical, vanity lights are also a significant design element in your bathroom. Think about how they will integrate with your existing decor.
- Matching Finishes: Try to match the finish of your new light fixtures with other metal elements in your bathroom, such as faucet handles, towel bars, and cabinet pulls. Popular finishes include brushed nickel, chrome, matte black, and brass. Consistency creates a cohesive and polished look.
- Durability and Moisture Resistance: Bathrooms are humid environments, so choose fixtures rated for damp or wet locations. This information is usually found in the product specifications. Look for materials that resist rust and corrosion, such as stainless steel, brass, or treated aluminum. Avoid materials that are prone to deterioration in moist conditions.
- Glass Type: The type of glass or diffuser material on your fixture affects light distribution. Frosted or opal glass diffusers soften the light, reducing glare and creating a more even glow. Clear glass can be stylish but might produce harsher, more direct light, potentially creating more shadows.
Smart Bulb and Dimmer Options
Technology has made bathroom lighting more versatile than ever. Incorporating smart bulbs and dimmers can dramatically enhance your experience.
- Dimmer Switches: A dimmer switch is almost a non-negotiable for vanity lighting. It allows you to adjust the brightness to suit different activities – bright for makeup application, softer for a relaxing bath. Ensure that both your light fixture and the bulbs you choose are dimmer-compatible. Not all LEDs are dimmable, so check the packaging.
- Smart Bulbs: These offer even more control. Many smart bulbs allow you to change not just brightness but also the color temperature (Kelvin) via a smartphone app or voice commands. Imagine being able to switch from a cool daylight for makeup to a warm, inviting glow for unwinding, all at the touch of a button. Some even offer scheduling features. While a bit more of an investment, smart bulbs provide unparalleled flexibility.
- Integrated LED Fixtures: Many modern vanity lights come with integrated LED modules rather than replaceable bulbs. These fixtures are often very energy-efficient and can have a sleek, minimalist design. The downside is that if the LED module fails, you typically have to replace the entire fixture, although most are designed for long lifespans.
Bulb Shape and Size for Optimal Fit
Even if a bulb is the right type (LED, incandescent, etc.), its physical dimensions matter, especially for enclosed fixtures.
- Clearance: Make sure the bulbs you choose physically fit within the fixture’s housing or globe without touching the sides. Overheating can occur if a bulb is too close to the fixture’s material, potentially causing damage or reducing bulb lifespan.
- Aesthetics: For fixtures where the bulb is visible, the shape of the bulb itself can contribute to the overall look. Edison-style bulbs, for example, have a distinct vintage charm. For frosted globes, the bulb shape is less critical as it’s hidden.
- Socket Type: Double-check the socket type your fixture requires (e.g., E26/E27 for standard screw-in, GU10, G9, etc.) and purchase bulbs with the corresponding base. This sounds obvious, but it’s a common oversight.
Planning the Installation Process
With your fixtures and bulbs chosen, it’s time to map out the installation. A good plan minimizes surprises and ensures a smooth, safe process.
Gathering Tools and Materials
Having everything you need on hand before you start saves countless trips to the hardware store and keeps the momentum going.
- Basic Hand Tools: You’ll definitely need screwdrivers (Phillips and flathead), a wire stripper/cutter, a voltage tester (non-contact is highly recommended for safety), and possibly pliers.
- Mounting Hardware: Your new light fixture should come with mounting screws and a bracket. Sometimes you might need additional anchors if you’re drilling into drywall where no stud is present.
- Safety Gear: Always wear safety glasses when working with tools and electrical components. Rubber-soled shoes are also a good idea for added electrical insulation.
- Ladder/Step Stool: Ensure it’s sturdy and allows you to comfortably reach the installation area.
- Optional but Helpful: A level to ensure your fixture is straight, painter’s tape to mark placement, and a helper to hold the fixture while you make connections.
Marking Placement and Leveling
Accurate placement is crucial for both aesthetics and functionality. Take your time with this step.
- Measure Carefully: Use a tape measure to determine the center point above your mirror, or the ideal height for side sconces (typically eye level).
- Use a Level: Before drilling any holes or securing brackets, hold the fixture or mounting plate in place and use a level to ensure it’s perfectly straight. Mark the drilling points lightly with a pencil. A crooked light fixture will always stand out.
- Visualize: If possible, have someone hold the fixture up while you step back and look at it from different angles. This helps ensure it looks proportional and aesthetically pleasing in the space.
Safety First: Shutting Off Power
This is the most critical step in any electrical installation. Never skip it.
- Identify the Breaker: Go to your electrical panel (usually in the basement, garage, or a utility closet) and locate the breaker that controls power to your bathroom lights. It might be labeled, or you might need to flip breakers one by one until the light in the bathroom turns off.
- Verify Power is Off: After flipping the breaker, return to the bathroom and try to turn on the light switch. If the light doesn’t come on, you’re on the right track. For an extra layer of safety, use your non-contact voltage tester directly on the wires in the junction box. If it signals power, you’ve chosen the wrong breaker, or there’s an unusual wiring situation.
- Communicate: If there are others in the household, let them know you’re working on the electricity and to avoid touching the breaker panel until you’re done. A piece of tape over the breaker can also serve as a visual reminder.
Step-by-Step Installation Guide
Now for the hands-on part. This guide assumes you have an existing electrical box. If not, consult an electrician.
Removing the Old Fixture
If you’re replacing an existing light, this is your starting point.
- Unscrew and Disconnect: Carefully remove any decorative caps or nuts holding the old fixture in place. Gently pull the fixture away from the wall to expose the wires.
- Note Connections: Before disconnecting, take a moment to observe how the wires are connected. Typically, you’ll see black (hot) to black, white (neutral) to white, and a bare copper or green wire (ground) connected to the fixture’s ground wire or a ground screw on the mounting bracket. Taking a picture with your phone can be a helpful reference.
- Disconnect Wires: Untwist the wire nuts to disconnect the old fixture’s wires from the house wiring. Remove the old mounting bracket from the junction box.
Installing the New Mounting Bracket
The mounting bracket is the foundation for your new light fixture.
- Orient Correctly: Your new fixture will come with a mounting bracket that attaches to the electrical junction box. Make sure you orient it correctly according to the instructions so that the fixture can be properly secured to it. There might be different holes for horizontal or vertical mounting, depending on your fixture type.
- Secure to Junction Box: Align the bracket’s screw holes with the holes in your junction box and secure it with the screws provided. Make sure it’s snug and doesn’t wobble. This bracket is what will bear the weight of your new light.
- Ground Wire: If your new fixture’s ground wire isn’t directly incorporated into the main wiring bundle, there’s usually a green ground screw on the mounting bracket. Connect the house’s bare copper ground wire to this screw, or connect the fixture’s ground wire to the house ground wire using a wire nut.
Wiring the New Fixture
This is where you make the electrical connections. If you’re unsure, please consult an electrician.
- Identify Wires: You’ll typically have three types of wires coming from your house wiring:
- Black (Hot): This carries the live current.
- White (Neutral): This completes the circuit.
- Bare Copper or Green (Ground): This is a safety wire designed to prevent electric shock.
- Connect Wires:
- Ground: Connect the new fixture’s bare copper or green ground wire to the house’s bare copper or green ground wire. If your fixture has a ground screw on its mounting plate, you’ll also connect the house ground wire to that screw.
- Neutral: Connect the new fixture’s white wire to the house’s white (neutral) wire.
- Hot: Connect the new fixture’s black wire to the house’s black (hot) wire.
- Secure with Wire Nuts: Twist wire nuts tightly onto each connection to ensure a secure, insulated connection. Give each wire a gentle tug to confirm it’s secure.
- Tuck Wires: Carefully fold and push the connected wires back into the junction box, making sure no bare wire is exposed outside of the wire nuts. You want enough slack so that the fixture can sit flush against the wall without pinching wires.
Mounting the Fixture Body
With the wiring done, it’s time to secure the main part of the light fixture.
- Align and Attach: Align the fixture body with the mounting bracket and secure it using the screws or decorative caps provided. Be careful not to overtighten, especially if the fixture has glass components.
- Check for Stability: Once mounted, gently test the fixture to ensure it’s firmly attached and doesn’t wobble.
- Install Bulbs and Glassware: Screw in your chosen bulbs. Then, attach any glass shades, diffusers, or covers according to the manufacturer’s instructions. Again, be gentle with glass.
Testing and Final Adjustments
The moment of truth!
- Restore Power: Go back to your electrical panel and flip the breaker back on.
- Test the Light: Return to the bathroom and turn on the light switch. If everything is connected correctly, your new vanity light should illuminate!
- Check for Issues:
- No Light: If the light doesn’t turn on, turn off the power at the breaker immediately. Double-check all wire connections, ensure bulbs are screwed in tightly, and that the wires inside the junction box aren’t pinched or loose.
- Flickering: Flickering can sometimes indicate a loose connection, an incompatible dimmer, or a faulty bulb.
- Enjoy: Once everything is working perfectly, step back and admire your handiwork. The right vanity lighting can truly transform the feel and functionality of your bathroom.
Troubleshooting Common Issues
Even with careful planning, sometimes things don’t go exactly as expected. Here are a few common problems you might encounter and how to address them.
Light Not Turning On
This is probably the most frustrating issue, but often has a simple solution.
- Verify Power: First and foremost, go back to the breaker and ensure it’s fully in the “on” position. Sometimes breakers trip and rest in a middle position. Flip it fully off, then fully on. Use your voltage tester to re-verify power at the switch and fixture connections.
- Check Bulbs: Are the bulbs securely screwed in? Are they the correct wattage/type for the fixture? Are they functional (try them in another working lamp if unsure)?
- Wiring Connections: Turn off power at the breaker, then double-check every wire connection inside the junction box. Ensure all wire nuts are tight, and no stray copper strands are touching other wires or the metal box. A loose neutral wire (white) is a common culprit for no power.
- Switch Issues: If the switch itself is old, it might be faulty. If you have a multi-meter, you can test the switch for continuity when it’s in the “on” position (with power OFF at the breaker!).
- Fixture Defect: Although rare with new fixtures, sometimes a fixture itself can be defective. If you’ve tried everything else, this might be a possibility, and you’d need to contact the retailer or manufacturer.
Flickering or Dim Lights
Flickering can be annoying and sometimes indicates a more subtle problem than a complete power outage.
- Loose Connections: This is the most common cause. Power off, then re-tighten all wire nut connections at both the fixture and the switch. Even a slightly loose wire can cause intermittent contact.
- Incompatible Dimmer: If you’re using a dimmer, ensure both the light fixture and the bulbs are specifically rated as “dimmable LEDs” or “dimmable CFLs.” Older dimmers designed for incandescent bulbs may not work correctly with newer LED or CFL technology, leading to flickering, buzzing, or inconsistent dimming. Replacing the dimmer with an LED-compatible one usually solves this.
- Faulty Bulbs: Even new bulbs can sometimes be faulty. Try swapping them out with known-good bulbs if you suspect this.
- Overloaded Circuit: While less common for a single light fixture, if the circuit is overloaded with too many devices, it can lead to voltage drops and dimming. This would usually affect other lights or outlets on the same circuit too.
- Voltage Fluctuations: Rarely, issues with your home’s main electrical supply or local utility can cause voltage fluctuations, affecting light output. This would typically be a widespread issue, not just affecting one light.
Uneven Lighting or Shadows
This usually comes down to placement or the type of fixture chosen.
- Fixture Placement:
- Above the Mirror: If your light is mounted only above the mirror and you’re getting shadows under your chin and eyes, the light might be too high, too focused downwards, or not wide enough. Adding side sconces can often resolve this, or replacing the overhead bar with a wider, more diffused fixture.
- Side Sconces: If sconces are too high or too low, they can create awkward shadows. The ideal height is generally eye level. If they are too far apart, you might get a dark spot in the center of your face.
- Bulb Type/Kelvin: If the light appears too harsh or too warm/cool for tasks, you might need to change the Kelvin temperature of your bulbs. For makeup, a 3500K-4000K “neutral white” or “daylight” is often preferred.
- Wattage/Lumens: Insufficient brightness (low lumens) can lead to the feeling of uneven lighting, simply because there isn’t enough light to properly illuminate the entire face. Consider increasing the lumen output if possible.
- Mirror Reflection: Sometimes the mirror itself (if it’s textured or angled oddly) can contribute to strange reflections or perceived unevenness. Ensure your mirror is clean and flat against the wall.